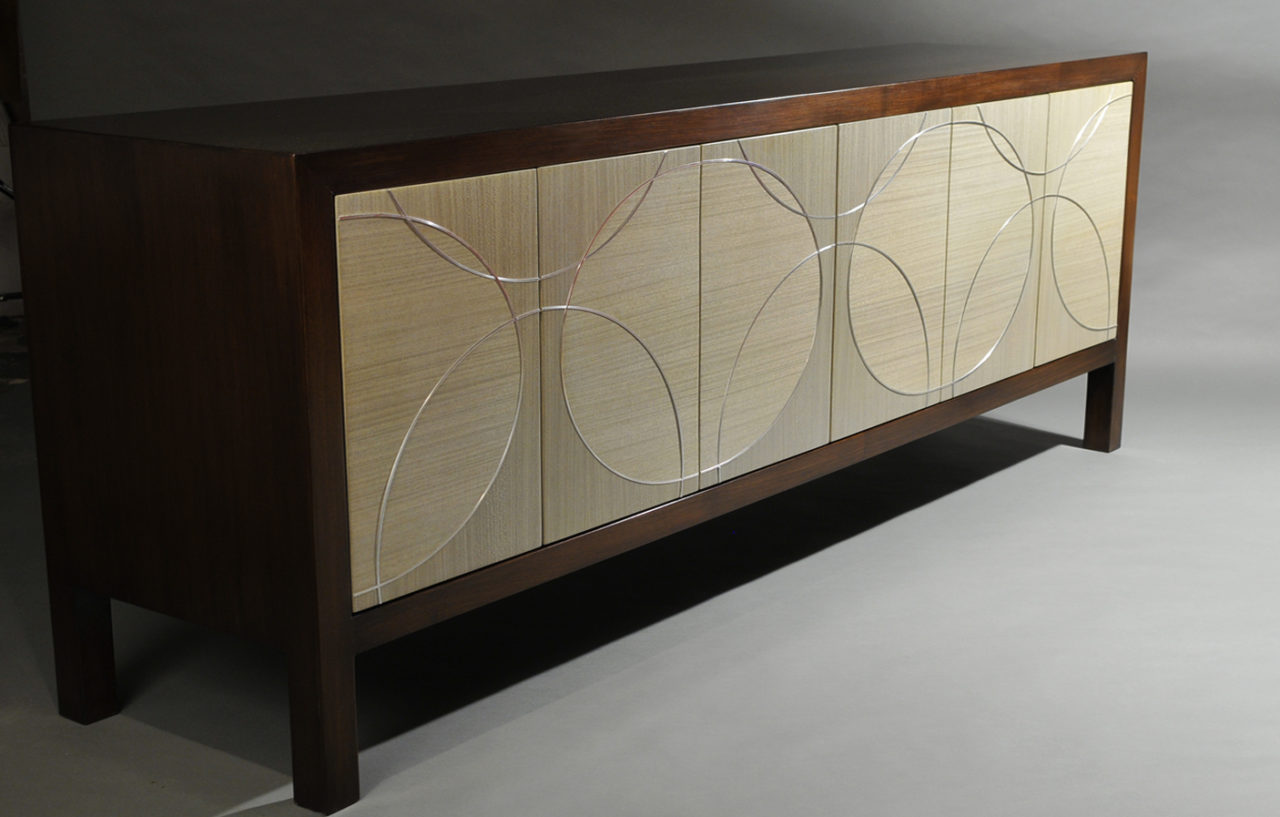
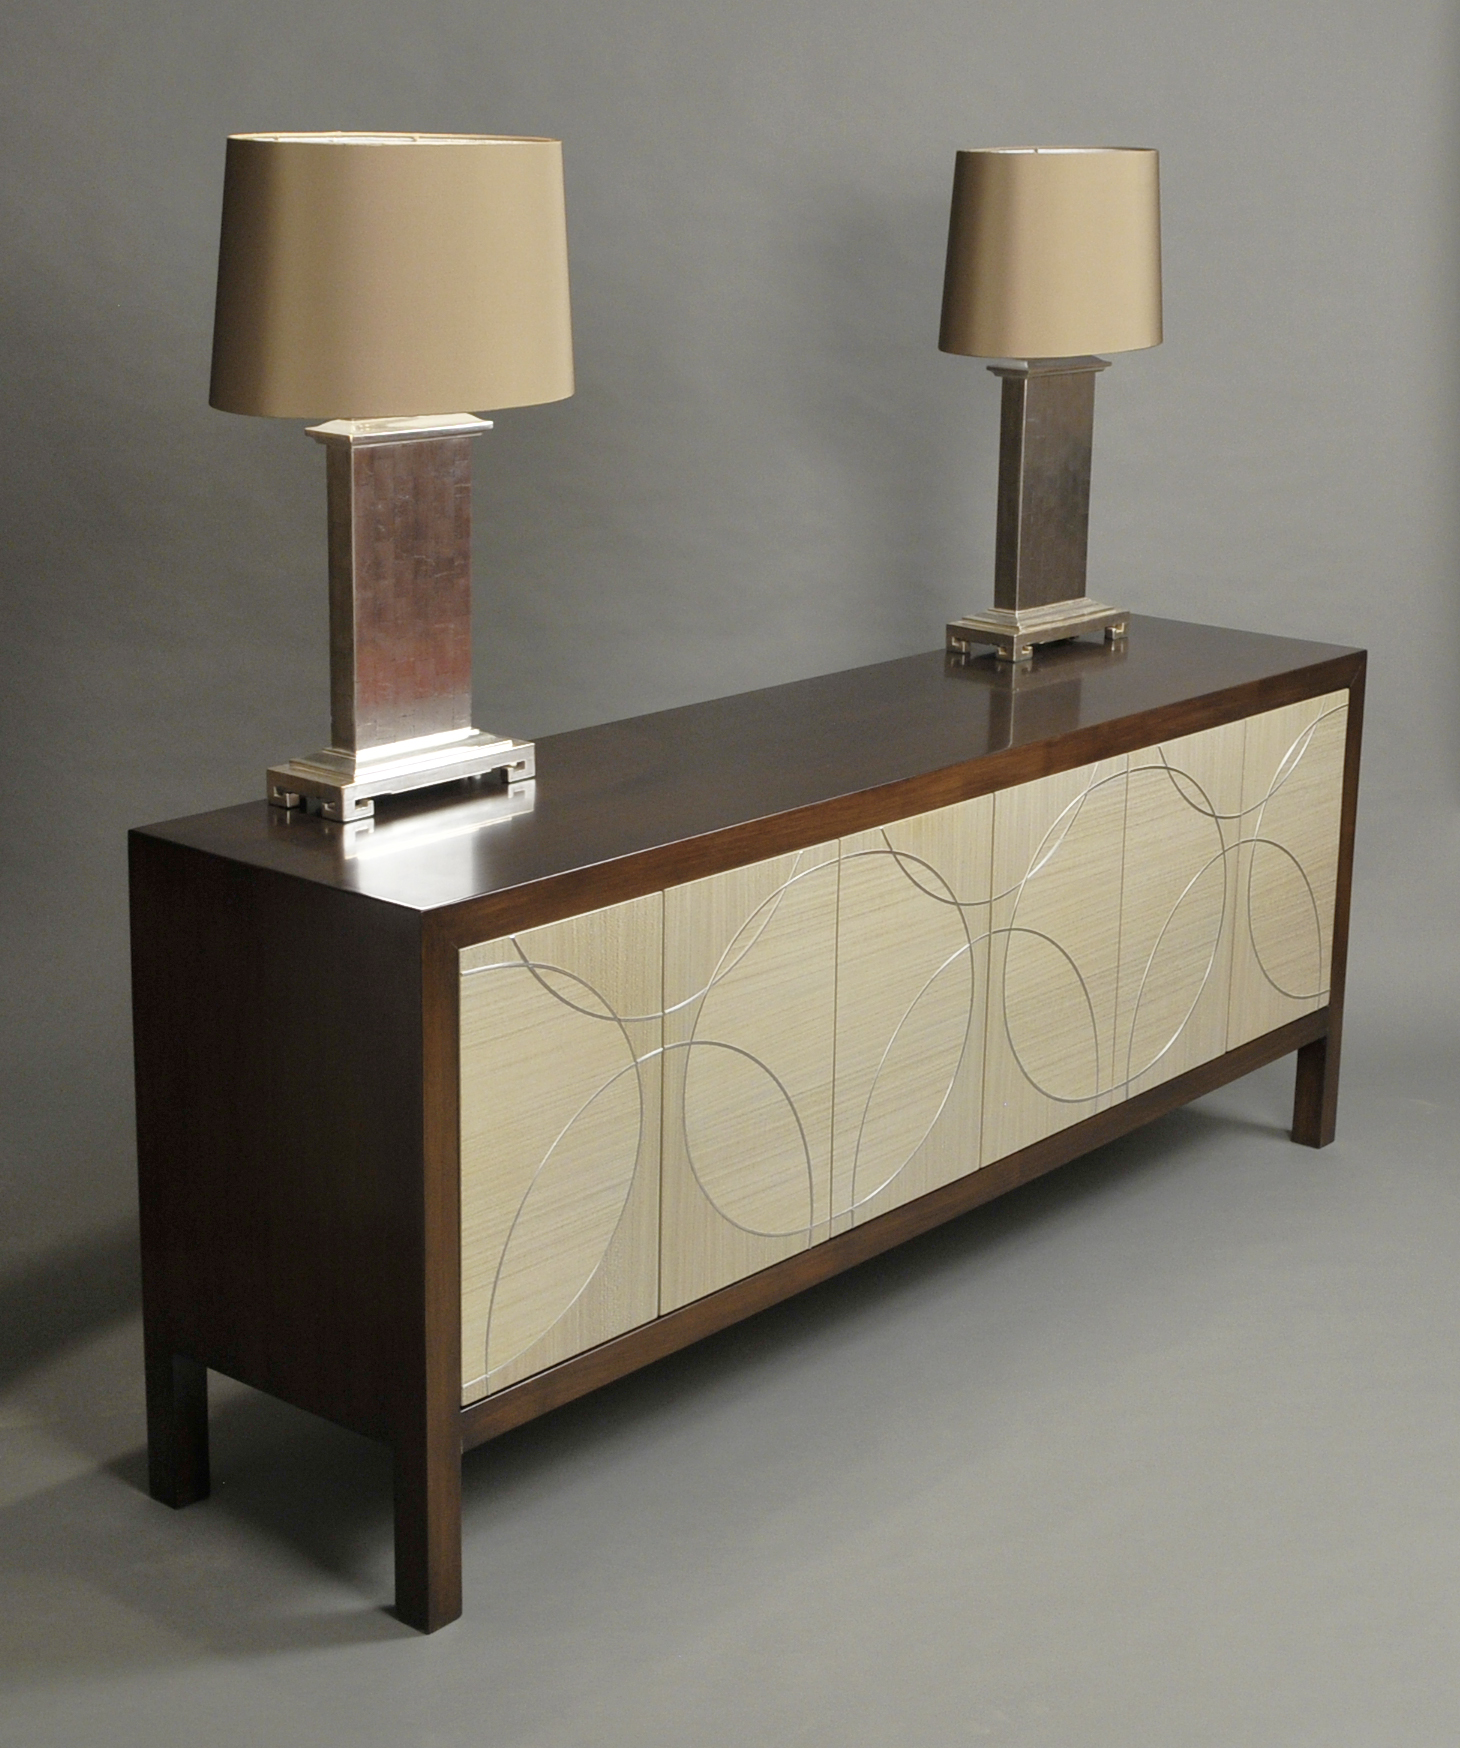
As I thought about what to write for this piece, I came to the conclusion that in this day and age, we have established all the different types of furniture pieces that we will probably ever need: Dressers for clothes, chairs for sitting and tables for dining. Sure there are other common items that I haven’t mentioned, but my black walnut and koto credenza fits in with all the other credenzas of the world. It’s a pretty standard piece.
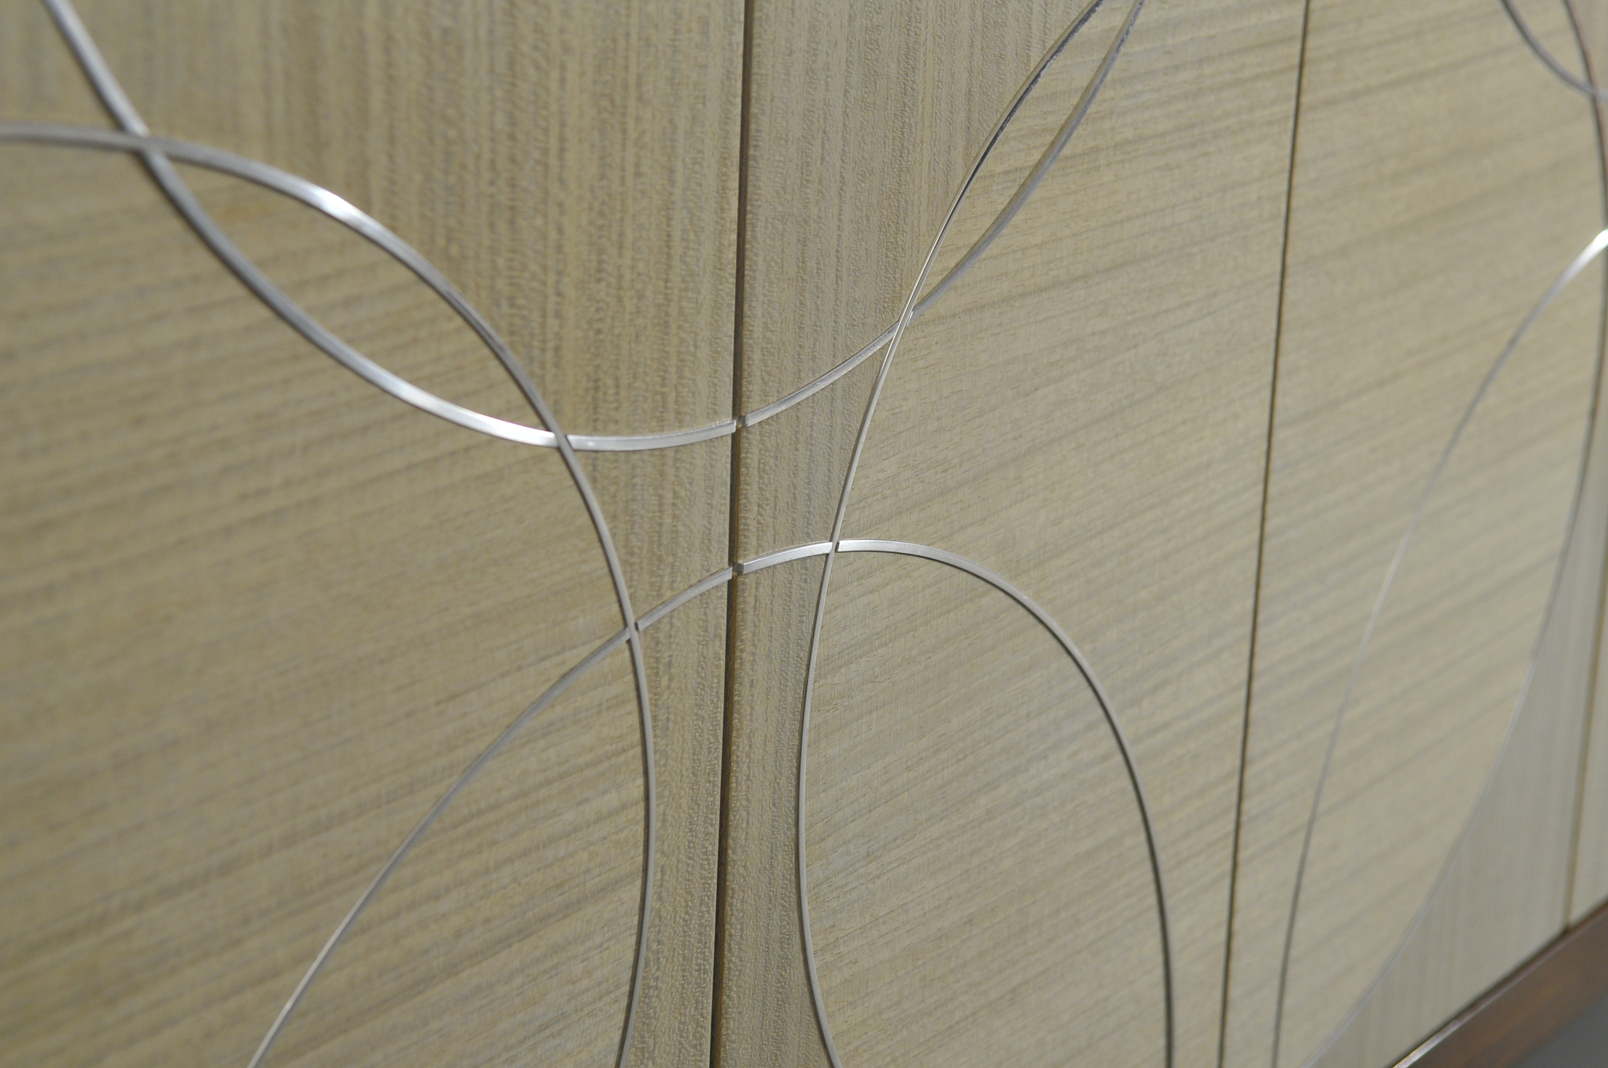
What sets it apart, however, is the decorative work on the face. The black walnut body simply “frames” the lighter dyed koto doors and focuses the eye on the fun stuff; The cherry, the grape, the bling. I wanted to do something different and thought, “how many furniture people play with round shapes and two different grain directions? Not to mention installing metal strips. Maybe some consider it, but not too many do it.”
In terms of the dyed koto veneer, it’s pretty cool stuff. This is the second batch I’ve played with. The first batch was a beautiful nickel/oatmeal color with a lot of intricate grain patterns. When finished, it shimmered and “moved” like mahogany when viewed from different angles. Please see the Silver Leaf Commissioned Armoire https://markluedeman.com/commissioned-silver-leaf-armoire/.
The batch I used for this piece, however, was a bit grayer. Actually, it was too gray for my liking. So I hit the doors with a thin wash of a khaki green dye and the color turned out beautifully. It compliments the shades of the Silver and Palladium Leaf Lamps https://markluedeman.com/silver-palladium-leaf-lamps/that I made, which are part of a bigger plan. I’m looking to show these pieces in the near future.
Building the Piece
Building my black walnut and koto credenza seemed like a pretty straight forward process, but there were some challenges along the way. The front and back edges are made of solid walnut and were chosen for their extremely straight grain complimenting the linear grain patterns of the top and sides. Though mitered on the face, these pieces are actually lapped together to create stronger joints. As the entire piece came together, I left the back and internal uprights out to simplify the finishing process. Otherwise I’d be spraying into a “box” and getting a lot of blowback in my face. So each piece was finished separately and then installed.
The Koto Doors
Each door was assigned a specific location and customized to fit. The edges received three layers of koto veneer and then the doors were set aside while I made my cutting jigs for creating the veneer shapes. As you’ll notice, the horizontal veneer on the middle doors cross over to its neighbor. It was imperative that I labeled and kept track of each veneer piece and mounted them accordingly. Cutting the shapes was actually quite simple, being that I had the individual veneer leaves mounted on backer sheet of paper which held them together. Once done, I taped the complimentary shapes together and applied them to the doors. The backs of the doors also received a layer of koto.
Installing the Metal
Now that I had six doors with veneer on them, it was time to cut the groves for the metal edging. In truth, this process terrified me and I was slow to proceed. I worked diligently to create the appropriate sized jigs for guiding my handheld router and thought long and hard about the steps to follow. Doors were paired up accordingly and the cutting jigs clamped firmly in position. Thankfully, every cut I made went off without a hitch. No room for errors here!
The doors then received their khaki dye and several layers of catalyzed lacquer.
The final step in this woodworking adventure was installing the metal.
Each piece was bent around a curved form creating the arcs I needed. Once done, each was painstakingly cut to size on the table saw; a nerve wracking process I might add, because I don’t like cutting small pieces of metal on such a powerful tool. They have a tendency to take flight. Thankfully, I finished the task without incident and each piece was gently pounded into place.
In hindsight, I kinda surprised myself because the process for creating these doors was actually simpler than I had envisioned. I guess it was the result of good planning and the mantra I kept saying in my head, “You don’t have time for mistakes. Just do it right the first time.”
In the end, it’s nice to see my black walnut and koto credenza cross the finish line. It’s taken me about a year to complete, but now I know what to do and the second one will be that much faster to create.