
After so many years of building from the modified plans of others, I thought it was time to start looking inward and seeing what I could produce. This foyer table was my first effort, and meant to be the first in a line of many. The only limitation I placed on myself, was that I couldn’t purchase any new materials. I could only use what was in the shop. Kind of a cool challenge I thought.
Designing the Foyer Table

I love seeing gentle “S” curves in nature and want to reproduce them in my work. So I began by drawing the curved legs for this table over and over again until I found the right proportions and ended up with this tulip shape. What makes these legs unusual is that they are incredibly strong and won’t crack or break over time. The core of each is laminated poplar with solid walnut and veneer added to the exteriors.
The Table’s Top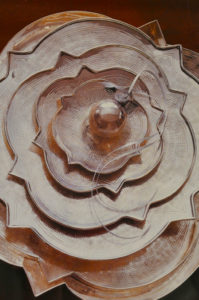
For the top, I was looking for something different, yet not so different that it would turn people off. My first attempt crashed and burned, so to speak, and remains in the shop. I continued the hunt and eventually came across a photo of some unusual serving trays, which were round with these funny points. I found them very appealing and designed accordingly. So I cut out a new top, fattened up the edges with some solid walnut and then proceeded to veneer it.
I used quartered and figured black walnut for the center field and applied it in a book match pattern. Once in place, I trimmed the veneer a consistent distance from the edge and then applied a lighter boarder material. It was a slow and meticulous process joining the two. Then repeated the trimming process and proceeded with the outer boarder material. As you can see, this darker veneer cascades over the table’s edge and is perfectly aligned with the top material. Not an easy task, but well worth the time.
The Base
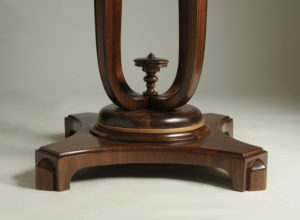
When I began, I wasn’t sure what the base would look like and so needed to explore a few options. I wanted to create some visually harmony between the top and bottom elements, but it took months of pondering and I still couldn’t decide. I guess I was frustrated by having too many options, but in time, came up with a couple of layers that hid the legs’ connecting brackets. In the end, it worked out quite nicely and made for a sturdy connection.
The Finishing
Once completed, the wood was grain filled and then lightly sanded. The wood was dyed and then stained. The real fun began when the first layer of sealer darkened the piece and the grain pattern came to life! As additional layers of lacquer were applied, the piece began to glow and shimmer. Characteristics of a finely finished piece.
Wood never ceases to amaze me!